Accessible Benches and Seating
The dimensions and details that make a public bench usable for older adults, wheelchair users and people with limited strength or vision, plus a checklist for your next order.
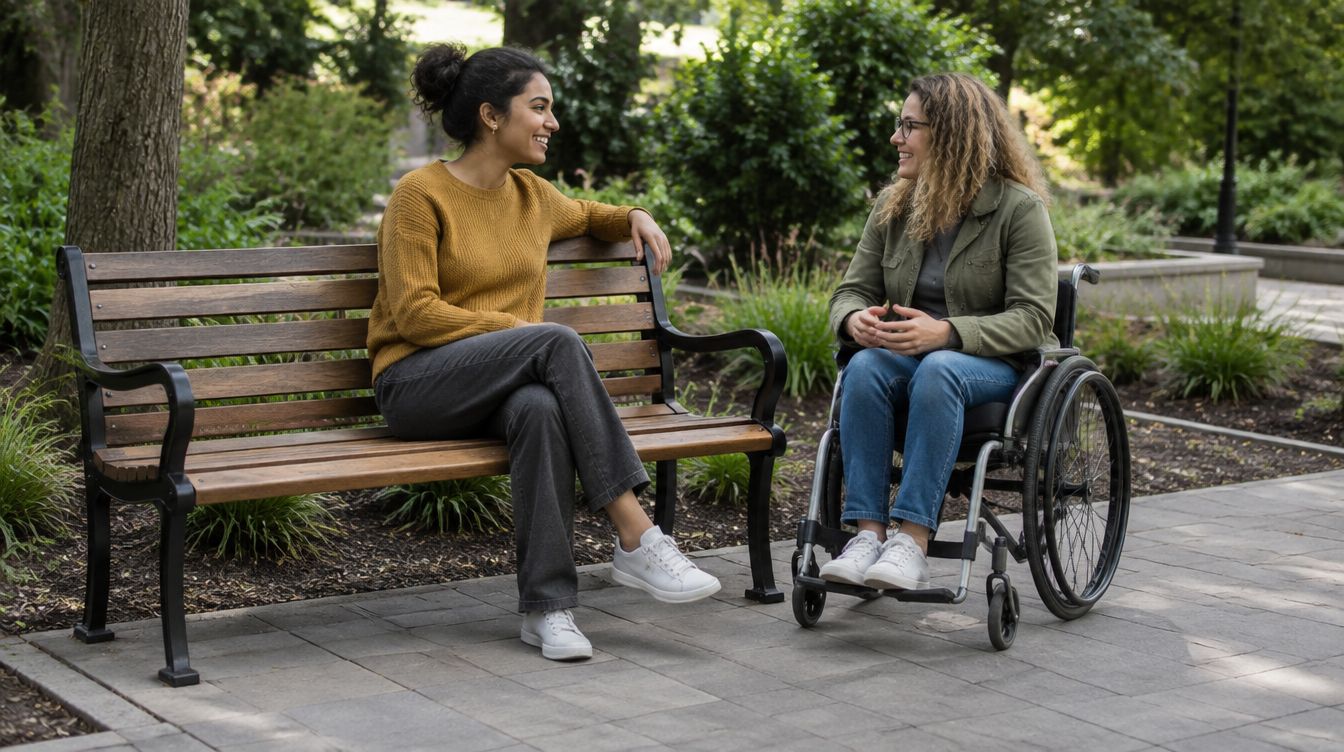
An accessible bench is one that a wide range of people can reach, sit on, rest on and get up from without help. That includes older adults, people using canes or walkers, wheelchair users who want to sit beside a companion, and parents juggling a stroller. Most of the work comes down to a handful of dimensions and a few design choices that are easy to get right at the ordering stage and expensive to fix later.
In Canada, CSA B651 (Accessible design for the built environment) covers seating, and Ontario's AODA Design of Public Spaces standard sets rules for features such as rest areas along recreational trails. Other provinces rely on their building codes, the National Building Code of Canada and municipal design standards. Requirements vary by jurisdiction and project type, so confirm what applies with your local authority before you finalize a layout.
Seat height and depth
Seat height matters more than anything else for people who find it hard to stand up. A seat that is too low forces the knees above the hips and makes rising a struggle. A seat that is too high leaves shorter people with their feet dangling.
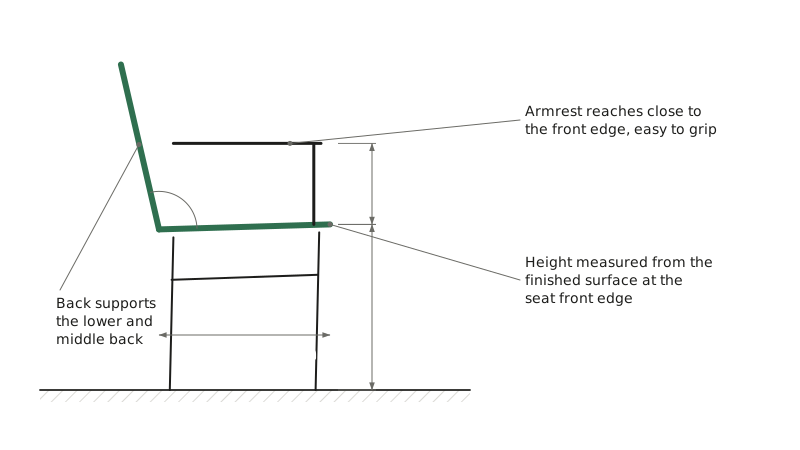
- Height: aim for 430 to 485 mm (17 to 19 in) from the finished ground to the top of the seat at its front edge. This range lines up with common accessibility guidance and suits most adults.
- Depth: a seat depth around 450 to 500 mm (18 to 20 in) supports the thighs without pushing shorter users forward off the back. Very deep seats look generous but make it hard to reach the backrest.
- Slope: a slight backward tilt of a few degrees keeps people from sliding forward and helps water drain. Too much tilt makes standing up harder.
- Front edge: a rounded or waterfall front edge reduces pressure behind the knees.
Measure height from the finished surface, not the slab. A bench set on a concrete pad that later gets a thicker paver topping can lose an inch of height without anyone noticing.
Back support and armrests
A backrest lets people rest for longer and gives them something to push against when they stand. Look for a back that runs most of the length of the seat and supports the lower and middle back, with a gentle recline of roughly 100 to 105 degrees between seat and back. Upright backs feel stiff. Deep recline makes getting up harder.
Armrests are the most underrated accessibility feature on a bench. People use them as levers to lower themselves down and push themselves up. To work well, an armrest should:
- reach close to the front edge of the seat, where the hands naturally go when rising;
- be easy to grip, with rounded edges and no sharp corners;
- be rigid enough to take a person's full weight on one side;
- sit at a comfortable height above the seat, usually somewhere around 200 to 250 mm (8 to 10 in).
On long benches, a centre arm helps people who need support on both sides. Our Flat Bar Bench can be ordered with end and centre arms for this reason.
Clear space beside the bench
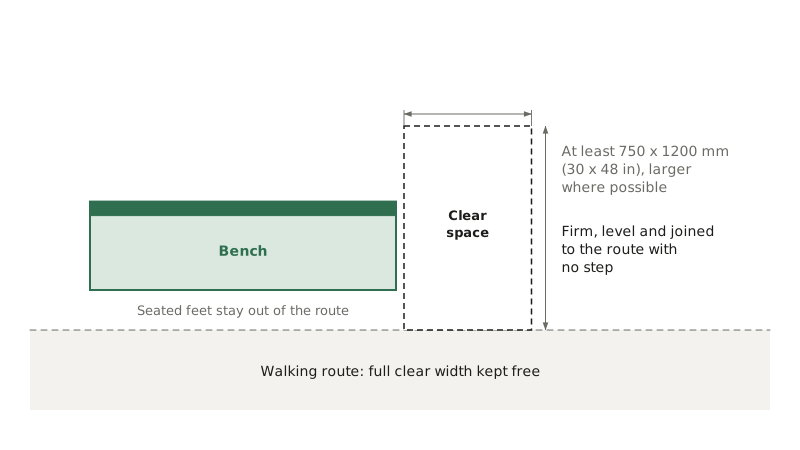
A wheelchair user often wants to sit next to friends or family rather than across a path from them. Provide a level clear space beside at least one end of the bench, outside the walking route, so a wheelchair or scooter can pull in alongside the seat.
- Size the space for a wheelchair: at least 750 x 1200 mm (30 x 48 in), and larger where you can, since newer CSA B651 editions and many municipal standards call for more room.
- Use a firm, stable, slip-resistant surface such as concrete or pavers. Grass, loose mulch and pea gravel do not work.
- Connect the space to an accessible route without a step or a steep cross slope.
- Keep the bench, the clear space and anyone's feet out of the path of travel so the walking route stays at full width.
The same space works for a parked stroller, a walker or a guide dog lying down. It rarely goes to waste.
Materials, contrast and comfort
People with low vision need to see a bench before they walk into it. Choose a colour that contrasts with the paving behind it, and avoid placing a dark bench on dark asphalt. Rounded edges and closed ends on arms reduce the chance of injury if someone does bump into it.
Surface temperature also matters. Dark steel in full sun can get hot enough to be uncomfortable, and bare metal is cold in winter. Wood and recycled plastic stay closer to air temperature. If you choose steel, a lighter colour or a shaded location helps. Gaps between slats should let water drain and snow clear without being wide enough to catch a cane tip or fingers.
Offer a mix of seating
No single bench suits everyone. A good public space offers choice:
- backed benches with arms for people who need support;
- a few seats at the higher end of the height range for people with hip or knee problems;
- backless benches or seat walls for short stops and groups;
- open space next to seating for wheelchairs and strollers.
Spread accessible seats through the site instead of grouping them in one corner. Place them where people actually wait or rest: near entrances, transit stops, washrooms, play areas and along longer walking routes.
Ordering checklist
- Confirm which accessibility standard and edition applies to the project.
- Check seat height at the front edge against the finished surface level.
- Specify a backrest and at least end armrests on the benches meant for longer rest.
- Show a wheelchair clear space beside each accessible bench on the site plan.
- Pick a colour with strong contrast against the surrounding paving.
- Confirm the route to the bench is firm, level and wide enough.
- Check that mounting hardware and footings do not create trip hazards.
Frequently asked questions
How many benches on a site need to be accessible?
It depends on the jurisdiction and the type of space. Some standards set a percentage for specific settings such as trails or outdoor recreation areas, while others leave park seating to municipal policy. Ask your local authority, and when in doubt make most benches meet the core dimensions above. It costs little extra.
Are armrests always required on accessible benches?
Not in every standard, but they make a large practical difference for people who struggle to stand. Providing arms on at least some benches in each seating area is a sensible minimum.
Can a backless bench be accessible?
A backless bench at the right height with clear space beside it is usable by many people, but it offers no support for longer rest. Pair backless seating with backed benches nearby. Our guide to backed and backless benches covers the trade-offs.