Bike Rack Installation Methods
Surface mount, in-ground and rail mount installations each suit different surfaces, budgets and timelines. Here is how each method works and when to choose it.
A bike rack is only as secure as its connection to the ground. A rack that can be unbolted or wiggled loose is an invitation to thieves, and a rack that leans after its first winter looks neglected. There are three common ways to install a rack: bolted to the surface, embedded in concrete or mounted on rails. This guide explains how each one is done, what it costs in time and effort, and the mistakes that lead to loose or damaged racks.
Before you install: checks for every method
- Locate utilities. Anything that drills or digs needs a utility locate first. Use your provincial one-call service, such as Ontario One Call or Click Before You Dig in other provinces. Even shallow anchors can hit a buried electrical line in a slab.
- Confirm permission. Racks on public sidewalks usually need a municipal permit. Private sites may need landlord or condominium approval.
- Mark the layout. Chalk or paint the rack positions and the outline of parked bikes, then check clearances to walls, curbs and the walking route before drilling.
- Check the surface. Know what you are fixing into: its material, thickness and condition.
Surface mount
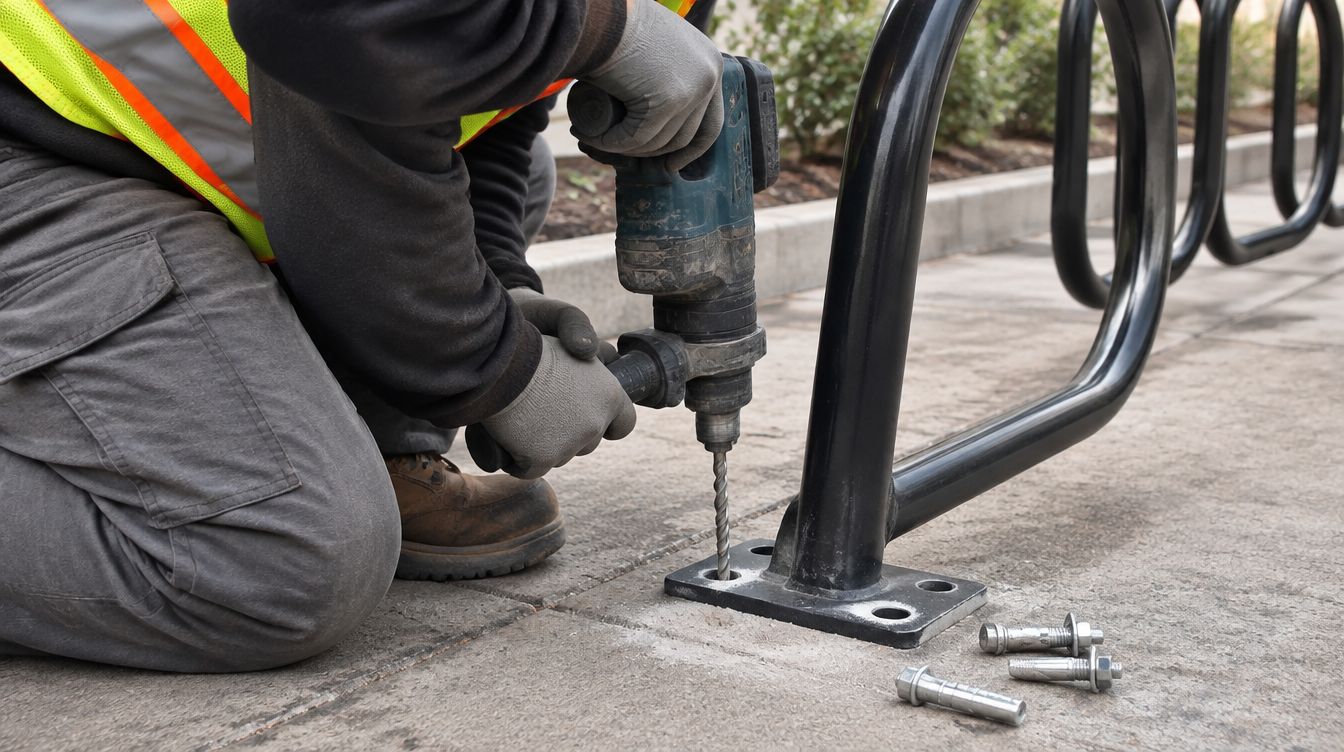
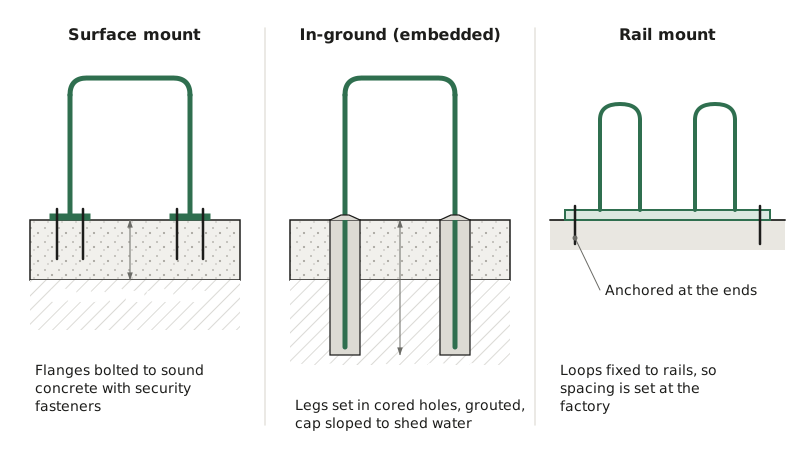
The rack has steel base plates, or flanges, at the foot of each leg. These are bolted to an existing concrete surface with expansion or wedge anchors.
How it is done:
- Set the rack in place and mark the anchor holes through the flanges.
- Drill holes with a hammer drill to the diameter and depth the anchor maker specifies.
- Blow out the dust. Dust left in the hole is the main reason anchors lose grip.
- Insert the anchors, set the rack, check that it is plumb and shim if needed.
- Tighten to the specified torque, then fit tamper-resistant nuts or caps.
Where it works: sound concrete slabs at least 100 mm (4 in) thick, ideally more. It suits retrofits, sidewalks and plazas where the concrete is already in place, and sites where racks may move later.
Watch out for: anchoring into asphalt, pavers or brick, which will not hold under constant use. Anchors close to a slab edge or a control joint can crack the concrete. Standard hex nuts can be removed with a wrench, so always use security fasteners.
In-ground (embedded)
The rack legs extend below grade and are set into concrete. Nothing is visible at ground level except the pipe entering the surface.
How it is done:
- Core drill or dig a hole for each leg, or form footings during new construction.
- Set the rack in the holes, brace it plumb and at the right height.
- Fill with concrete or non-shrink grout and let it cure before use.
- Finish the surface around the legs so water drains away from the pipe.
Embedment depth depends on the rack and the base. A typical figure for a rack leg set in an existing slab with a core is about 200 to 250 mm (8 to 10 in), but follow the manufacturer's detail and your engineer's or landscape architect's drawings, especially in areas with deep frost.
Where it works: new construction, parks and campuses where racks will stay put for many years. It is the most secure and tidiest method.
Watch out for: poor drainage around the legs. Water trapped where steel enters concrete is the classic place for rust to start, particularly where de-icing salt is used. A galvanized base finish and a sloped grout cap help a lot.
Rail mount
Several racks are welded or bolted to two parallel rails, which then sit on the ground. The rails can be freestanding or anchored at a few points.
Where it works:
- Surfaces you cannot or should not drill, such as decorative pavers, waterproofed decks or rented space.
- Seasonal or event parking that is set out in spring and stored in winter.
- On-street bike corrals, where a rail set can be placed in a parking lane and anchored at the ends.
- Sites where spacing must be exact. The rail fixes the distance between loops, so installers cannot crowd them.
Watch out for: a freestanding rail set can be dragged or lifted by several people, so anchor it wherever you can. Rails also create a low edge that can be a trip hazard, so keep them out of the walking route and make them visible.
Our Loop Rack and Halo Circle Rack are available for all three methods, so you can match the mount to each location on the same project.
Comparing the methods
| Factor | Surface mount | In-ground | Rail mount |
|---|---|---|---|
| Security | Good with security fasteners | Best | Fair to good, depends on anchoring |
| Installation effort | Low | Higher, needs curing time | Lowest |
| Removable later | Yes | Not easily | Yes |
| Surface needed | Sound concrete | Concrete footing or soil with footing | Any firm level surface |
| Best timing | Retrofit | New construction | Temporary, seasonal, corrals |
Winter, snow clearing and maintenance
In regions with snow, plan installation around winter operations. Racks in plow paths get hit. Racks in areas used for snow storage get buried. Mark rack locations with tall flags or delineators if plows work nearby, and tell the snow clearing contractor where racks are. Inspect fasteners each spring, retighten anything loose and touch up chipped coating at the base, where salt and moisture collect. Our winter durability guide has more on protecting steel from salt.
Frequently asked questions
Can I install a bike rack on asphalt?
Not directly with anchors. Asphalt is too soft to hold them. Pour a small concrete pad or footing under each rack, embed the rack in concrete, or use a rail-mounted set anchored at its ends.
What kind of anchors should I use?
Use stainless or galvanized concrete anchors sized to the base plate holes, installed as the anchor maker specifies, and finish them with tamper-resistant nuts or caps. Avoid plastic plugs and lag screws, which are easily pulled out.
Do I need a contractor?
Surface and rail mounts are within reach of a capable maintenance crew with a hammer drill. In-ground installation, work in public rights of way and anything near utilities is usually better left to a contractor familiar with local requirements.